Difference between revisions of "Nuclear's Solderless GH Controller Brains"
(Fix headings) |
|||
| Line 1: | Line 1: | ||
| − | + | == Installation/modding instructions == |
|
**It is assumed that the reader is doing one mod to one guitar, for the first time. If this isn't your first time, then skip the disassembly section as it will bore you.** |
**It is assumed that the reader is doing one mod to one guitar, for the first time. If this isn't your first time, then skip the disassembly section as it will bore you.** |
||
| Line 9: | Line 9: | ||
There are ways to avoid use of wirecutters, and to a lesser extent wire strippers. All that matters is that the job gets done. |
There are ways to avoid use of wirecutters, and to a lesser extent wire strippers. All that matters is that the job gets done. |
||
| − | + | === Disassembly === |
|
Remove the neck and strap from the guitar. Then the front plate. |
Remove the neck and strap from the guitar. Then the front plate. |
||
| Line 18: | Line 18: | ||
Remove all the screws, front and back. Then pry the guitar apart gently. There's parts inside we don't want to go everywhere. Specifically the whammy, which is inserted very loosely and is annoying to reinsert. |
Remove all the screws, front and back. Then pry the guitar apart gently. There's parts inside we don't want to go everywhere. Specifically the whammy, which is inserted very loosely and is annoying to reinsert. |
||
| − | + | === Preparing the Guitar === |
|
Disconnect the wires from the central board inside. You can do this with wirecutters or, if you're patient, by repeatedly bending the wires until they break. **It is important that the wires are removed as close to the board as possible, so they can be easily connected to your new Nuclear's GH Brains board.** Do NOT disconnect wires from anything else, unless you want to connect things in your own way or to some other hardware. |
Disconnect the wires from the central board inside. You can do this with wirecutters or, if you're patient, by repeatedly bending the wires until they break. **It is important that the wires are removed as close to the board as possible, so they can be easily connected to your new Nuclear's GH Brains board.** Do NOT disconnect wires from anything else, unless you want to connect things in your own way or to some other hardware. |
||
| Line 28: | Line 28: | ||
At this point we should be ready to install the new board. |
At this point we should be ready to install the new board. |
||
| − | + | === Installing the Board === |
|
Place the new Nuclear's GH Brains board in where the old board was, then screw in the new board to secure it in place: |
Place the new Nuclear's GH Brains board in where the old board was, then screw in the new board to secure it in place: |
||
| Line 52: | Line 52: | ||
You can now reassemble the rest of the guitar, and it should be ready to go as far as hardware goes. |
You can now reassemble the rest of the guitar, and it should be ready to go as far as hardware goes. |
||
| − | + | === Software Configuration (optional, for troubleshooting) === |
|
You can solve any software issues with the [https://github.com/sanjay900/guitar-configurator/ Guitar Configurator]. If you mixed up two signal wires, you can usually fix this with the configurator. Driver or other software issues? Same thing. |
You can solve any software issues with the [https://github.com/sanjay900/guitar-configurator/ Guitar Configurator]. If you mixed up two signal wires, you can usually fix this with the configurator. Driver or other software issues? Same thing. |
||
Revision as of 13:45, 9 June 2023
Installation/modding instructions
- It is assumed that the reader is doing one mod to one guitar, for the first time. If this isn't your first time, then skip the disassembly section as it will bore you.**
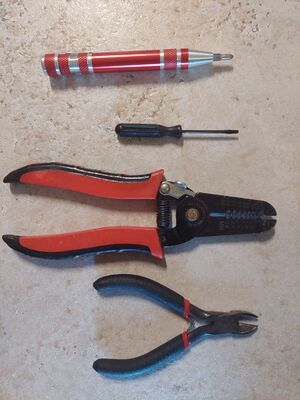
Tools needed:
There are ways to avoid use of wirecutters, and to a lesser extent wire strippers. All that matters is that the job gets done.
Disassembly
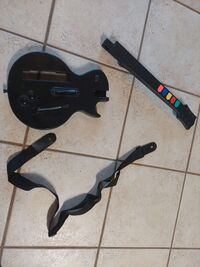
Remove the neck and strap from the guitar. Then the front plate.
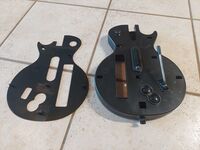
Remove all the screws, front and back. Then pry the guitar apart gently. There's parts inside we don't want to go everywhere. Specifically the whammy, which is inserted very loosely and is annoying to reinsert.
Preparing the Guitar
Disconnect the wires from the central board inside. You can do this with wirecutters or, if you're patient, by repeatedly bending the wires until they break. **It is important that the wires are removed as close to the board as possible, so they can be easily connected to your new Nuclear's GH Brains board.** Do NOT disconnect wires from anything else, unless you want to connect things in your own way or to some other hardware.
Strip all of the wires going to the board, so that about 2 millimeters of metal is exposed. These wires will be inserted into the green terminal blocks on the Nuclear's GH Brains board.
Unscrew the old board and remove it. Keep the plastic used to mount it in place, as the new board should be a drop-in replacement for the old board.
At this point we should be ready to install the new board.
Installing the Board
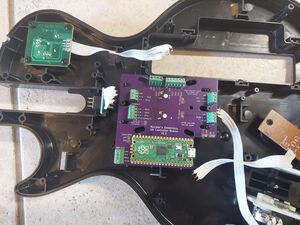
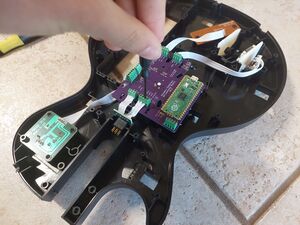
Place the new Nuclear's GH Brains board in where the old board was, then screw in the new board to secure it in place:
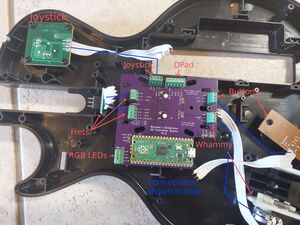
At this point you'll need to insert each wire into the board, and screw the terminal blocks in to secure the wires. First, here is where everything connects:
If your guitar doesn't have a DPad, or doesn't have a Joystic, or doesn't have LEDs, that's fine. You don't need to connect anything you're not using. Also, this board supports a 7-string guitar, but if you don't have a 7th string that's OK, you can leave that connection on the board empty.
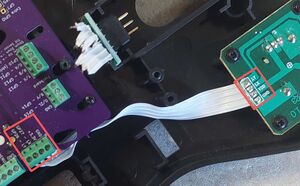
For placing the wires into the correct ports on your new board, you can typically follow the labels on the boards themselves. See the following example:
In this case, you match LX to LX, LY to LY, GND to GND, and +3.3v to VDD (3.3v and VDD are the same thing). Insert the stripped wire into each port, and with it fully inserted, screw in the green terminal block:
Make sure to check your connections by gently tugging on them after installation. The wires should not easily come out. Your board should now be properly installed. Move the wires out of the way of any screwholes or pinch points, you don't want the wires damaged when you reassemble the guitar (I did this - oops!). Finally, be sure to put a microUSB cable inside and connect it to the Pi Pico, and put it through whichever hole in the side of the guitar that you prefer.
You can now reassemble the rest of the guitar, and it should be ready to go as far as hardware goes.
Software Configuration (optional, for troubleshooting)
You can solve any software issues with the Guitar Configurator. If you mixed up two signal wires, you can usually fix this with the configurator. Driver or other software issues? Same thing.
In the future I'll expand this page for this stuff.
